The navigational ribbon at the top of the window in Microsoft Office programs like Word, Excel, and Powerpoint provides you with quick access to a lot of options.
Whether you want to add an object, format something, or reposition something, there’s probably a button or tool that you can use.
But the ribbon can get in the way, especially on smaller screens.
Luckily you are able to adjust the display of the ribbon, and you can even elect to make it collapse automatically.
How to Make the Microsoft Word Ribbon Collapse Automatically
- Open Word.
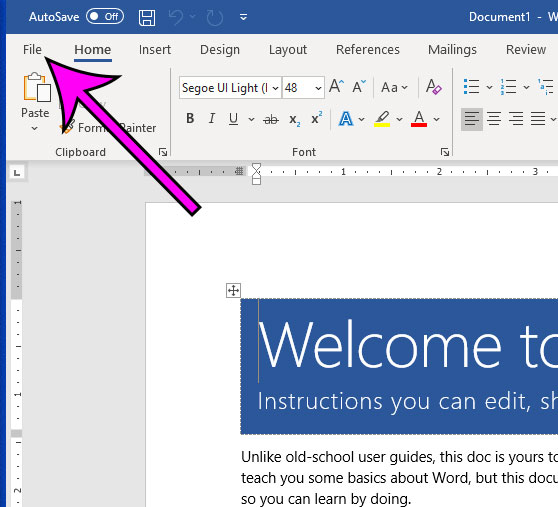
- Click File.
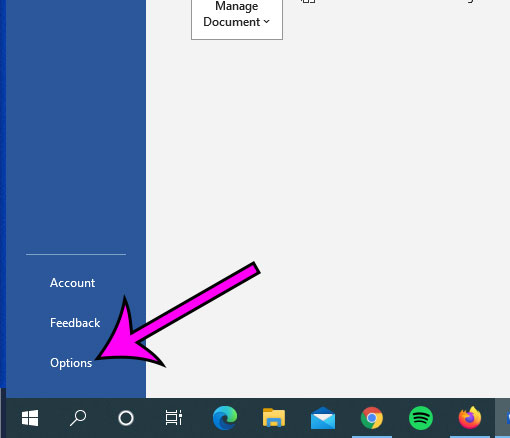
- Click Options.
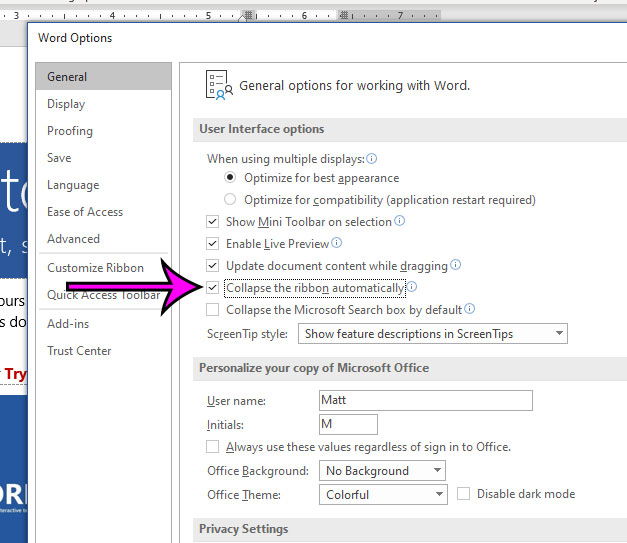
- Check the box next to Collapse the ribbon automatically.
- Click OK.
Our guide continues below with additional information on collapsing the ribbon automatically in Microsoft Word, including pictures of these steps.
When you want to make a change to your document or adjust some formatting, then you will typically go to the ribbon to find the right option. But you might be wondering how to collapse the ribbon automatically in Microsoft Word if you don’t want it expanded all the time.
While you may be using options in the ribbon on a regular basis, it does take up a considerable amount of space on your screen.
Therefore, if you would like to give your document a little more room, then you may decide to collapse the ribbon automatically when you aren’t using it.
Fortunately, this is an option available in Microsoft Word and you can learn how to change the setting by following our guide below.
This guide on how to print your Word background colors can show you a setting to fix if you need to include the page color when you print your document.
How to Collapse the Ribbon in Word When the Window is Smaller (Guide with Pictures)
The steps in this article were performed in the desktop version of Microsoft Word for Office 365.
Note that the ribbon will only collapse automatically when the app is not in full screen. If Word is in full screen then the ribbon will be fully visible.
Step 1: Open Microsoft Word.
Step 2: Click the File tab at the top-left corner of the window.

Step 3: Click the Options button at the bottom of the left column.

Step 4: Check the box to the left of Collapse the ribbon automatically.

Step 5: Click the OK button to save your changes.
You can also elect to collapse the ribbon manually by clicking the small arrow at the bottom-right of the ribbon.
Now that you know how ot make the Microsoft Word ribbon collapse automatically you will be able to adjust this setting whether you would like to make the ribbon visible or not.
Learn how to switch to landscape in Word if you would prefer to have your document in the landscape orientation.
Matthew Simpson has been creating online tutorial for computers and smartphones since 2010. His work has been read millions of times and helped people to solve a number of various tech problems. His specialties include Windows, iPhones, and Google apps.